Towers:
Here are some photo's of a series of medieval towers I am constructing, using mixed media: card stock printouts, and heavy cardboard tubes. My son brought them to me, from his job. I believe they originally held photo paper (at Walgreen's), but he thought I might be able to use them -- otherwise, they were going in the trash.
The construction techniques were actually quite simple. However, to make them, I needed a PDF card stock castle, and a dungeon. I had both sets already, from Fat Dragon Games products: EZ-Dungeon's Borderland Keep, Copper Dungeons Basic Set 1 & 2. This is just a re-purposing of these fine products, to fit my personal needs.
 |
| Completed Tower shown with a card stock Battering Ram and crew. |
List of things required for this project:
- Cardboard tubes, size varies, but I worked with what I was given;
- PDF Castle (walls, parapets, hatch doors for the tower floor on top) and PDF Dungeon (floor for top of towers, iron door used for entrance on ground level);
- PVA/White/School Glue;
- Disposable "School Paint Brush" (buy them by the pack, at Wal-Mart, in the school supplies area, around a dozen brushes for $1-$2);
- Paper cutter (a metal ruler, and a razor/X-acto knife will work, but they will be much more difficult to use to cut the card stock printouts)
- A marker (black, brown, or gray) to 'edge' the card stock cut-outs with.
- A Hot Glue Gun, Hi-Temperature (gives you more working time, before it hardens)
This project will require some artistic skills, as we will be piecing wall sections, and parapets together -- they won't be perfect, so if that bothers you, find another solution. You have been warned...
1. Locate a suitable wall section to cover the outside of the tube. Cut them to the needed size, then apply PVA Glue to the back side, sparingly, and use a disposable School Brush to spread it evenly over the surface of the card stock piece. Then align the piece over the tube, and burnish/rub it down, along one edge, making sure it is aligned properly. Continue burnishing it down -- if the PVA is distributed thinly, the card stock will adhere within seconds, and you won't be able to re-position it.
Repeat this process, carefully mating different pieces of wall sections, to completely cover your tube, top to bottom. Try to match seams, as much as possible, without going overboard (this is where the artistic part come into play).
2. Print out a suitable dungeon floor section on white card stock, to use as the floor for the tower's top. Apply this tile to glue side of a peel-n-stick vinyl floor tile ($0.39 per 12"-square, at Menards). Burnish it flat, and secure to the tile. Then trace out the tube on the tile, and use a utility scissors to cut out your round floor section. Hot Glue this to the tower's top, centering it carefully, with the dungeon floor facing up, vinyl floor tile surface to the inside of the tower. Edge the tile with a brown/black/gray marker, to conceal its edge, and to help it blend in.
Cut out a trap door, from card stock, edge it with the appropriate marker (black is fine, brown is better), apply a small amount of PVA Glue to its back, spread it with the School Paint Brush, and apply it where you want it on the tower's top stone floor. It should adhere within a few seconds, burnish it properly, to ensure it lies flat.
Repeat the trap door process with the iron door taken from whatever source you used (mine was the Dungeon set -- I had to cut it down to fit). Glue the iron door at ground level, where you want it to be; I put mine below the arrow loops on one side of the Tower, to give the defenders a chance to fire down upon anyone at the door...
The Iron Door I used had a background of stones virtually identical to the surrounding stones of the tower walls, so they blended rather well (if you look closely, you will see they are not a perfect match -- they never will be, without PhotoShop, and that is too much work for me!).
3. Next up, are the parapets, or the merlons, along the top of the tower, which give defenders cover from enemy fire from below. I fitted them, cut them according to what I needed for the Tower, then I followed the construction techniques to make them. I had to fudge them a bit, as no single piece was large enough to encompass the Tower's top; again, it is not perfect, and I had to overlap (be sure to glue the overlaps together!), but I was able to make it acceptable, at arm's length -- YMMV.
 |
| On the right, is the raw tube; on the left, is the finished Tower, complete with three Defenders looking down upon the iron door which is sealed against their enemies. They hope it holds!... |
 |
| Top down view of a raw tube, bottom, and the finished Tower, top, showing the trap door. |
 |
A closer view, from the front of the Tower. You can clearly see the trap door, on the top floor (card stock, cut and pasted in place), as well as the iron door at the base of the tower (card stock, cut and pasted in place, also).
7-12-2023 NOTE: For the parapets, print them on 8.5" x 11", full sheet label paper (Amazon.com). Apply them to a toilet paper roll tube, cut open, end-to-end. Apply the label paper to both sides, as appropriate. This will create a more-durable-than-paper, curved parapet. This can be glued, with PVA Glue, to the outside of the tower tube, at the top, as shown above.
For doors, check Etsy.com, for 3D printed iron doors. These can be painted, and Hot Glued onto the base of the towers, to give it some 3D depth. They also look fantastic!
|
 |
| An inside view of a raw tube, and the finished Tower, showing the vinyl floor tile, Hot Glue'ed in place. Note that I 'edged' the bottom of the card stock tiles forming the stone surface of the Tower, as well as the edge of the cardboard tube. This helps hide the white edges, which might otherwise detract from the Tower's appearance. |
 |
| Two more Towers in progress. Below the Towers, you can see a parapet piece which will be glued to one of the Towers, to complete it. While not perfectly matching, the pieces can be matched close enough, that at arm's length, most people won't notice the mismatches. The iron doors are not a perfect match, either, but unless you closely examine them, you won't see it -- and neither will they! |
 |
| A close-up view of my prototype Tower. I misaligned the card stock pieces, yielding a white edge, which I 'painted' with a brown marker. These will be covered with Woodland Scenics' ground cover foam, which will look like small brush growing at the base of the Tower. Subsequent Towers will be more carefully done, but this 'mistake', will also produce a nice effect, with the small brush applied to the base of the Tower. Not every mistake is a tragedy. Part of the learning curve, I guess. Cheers! |
These towers can be glued to an MDF base (not shown, yet...). The bases can be painted with Wood Glue, and colored sand applied, to create nice looking bases. These will, however, limit their deployment on your gaming table: the bases may interfere with castle wall sections you want to butt against them.
After the sand and glue dry, use more PVA Glue to attach lichen tufts (bushes/brush), or scenic tufts, to dress up the bases even more.
Project 2, Hobgoblin Watch Tower Project (12-1-13):
I realized that I could use a vine, from the top of a pumpkin, as the basis for this Watchtower: it looks like a tree, already, denuded of any branches (no painting required at all), and it has a cut-off, flat top, already. [I found a suggestion to use pumpkin vines for trees, over on DM Scotty's, DMs Craft Forum -- it is not my idea, I just borrowed it for this project.] The only thing I need to add, is the steps up the side, the sharp poles around the base, and the tower top, large enough to hold some figures. This should be one easy, very quick, terrain project.
 |
| Pumpkin vine, removed from the top of a pumpkin. |
 |
| Here you can see the bottom of the vine, after it has been removed from the top of the pumpkin. It will be necessary to clean this up a bit, to avoid any left-over plant matter from rotting: I scrubbed mine with a green scouring pad, and hot water. It requires a little bit of effort, but it is not difficult to do. The bottom surface is rather porous, so be sure to give it some time to dry completely, before applying any type of glue/adhesive, and mounting this to your base material. |
 |
| Here you can see the cut-off top of the vine piece. If is not cut level, you can take almost any type of saw, or even a sharp knife, and cut it more level. Be sure to exercise proper safety precautions, whenever you work with sharp tools! |
The wooden palisade, above, has been earmarked for use as a Hobgoblin outpost, to be attacked by a Dwarven army, for many years. Now I have outlying Watchtowers, to deploy some distance away from the palisade's walls, to give the Hobgoblins advance warning of an enemy's approach!
By the way, the Slayer's Guide, is top-notch! I would highly recommend it to any DM, as Hobgoblins are probably the fiercest, most disciplined, humanoid race, and they should be played as a terrible force to be reckoned with. In small groups, they can be easy fodder for low-level characters; in large groups, they are cunning, and extremely well organized, and they can be a terrible challenge to higher level characters, due to their organization, and tribal skills.
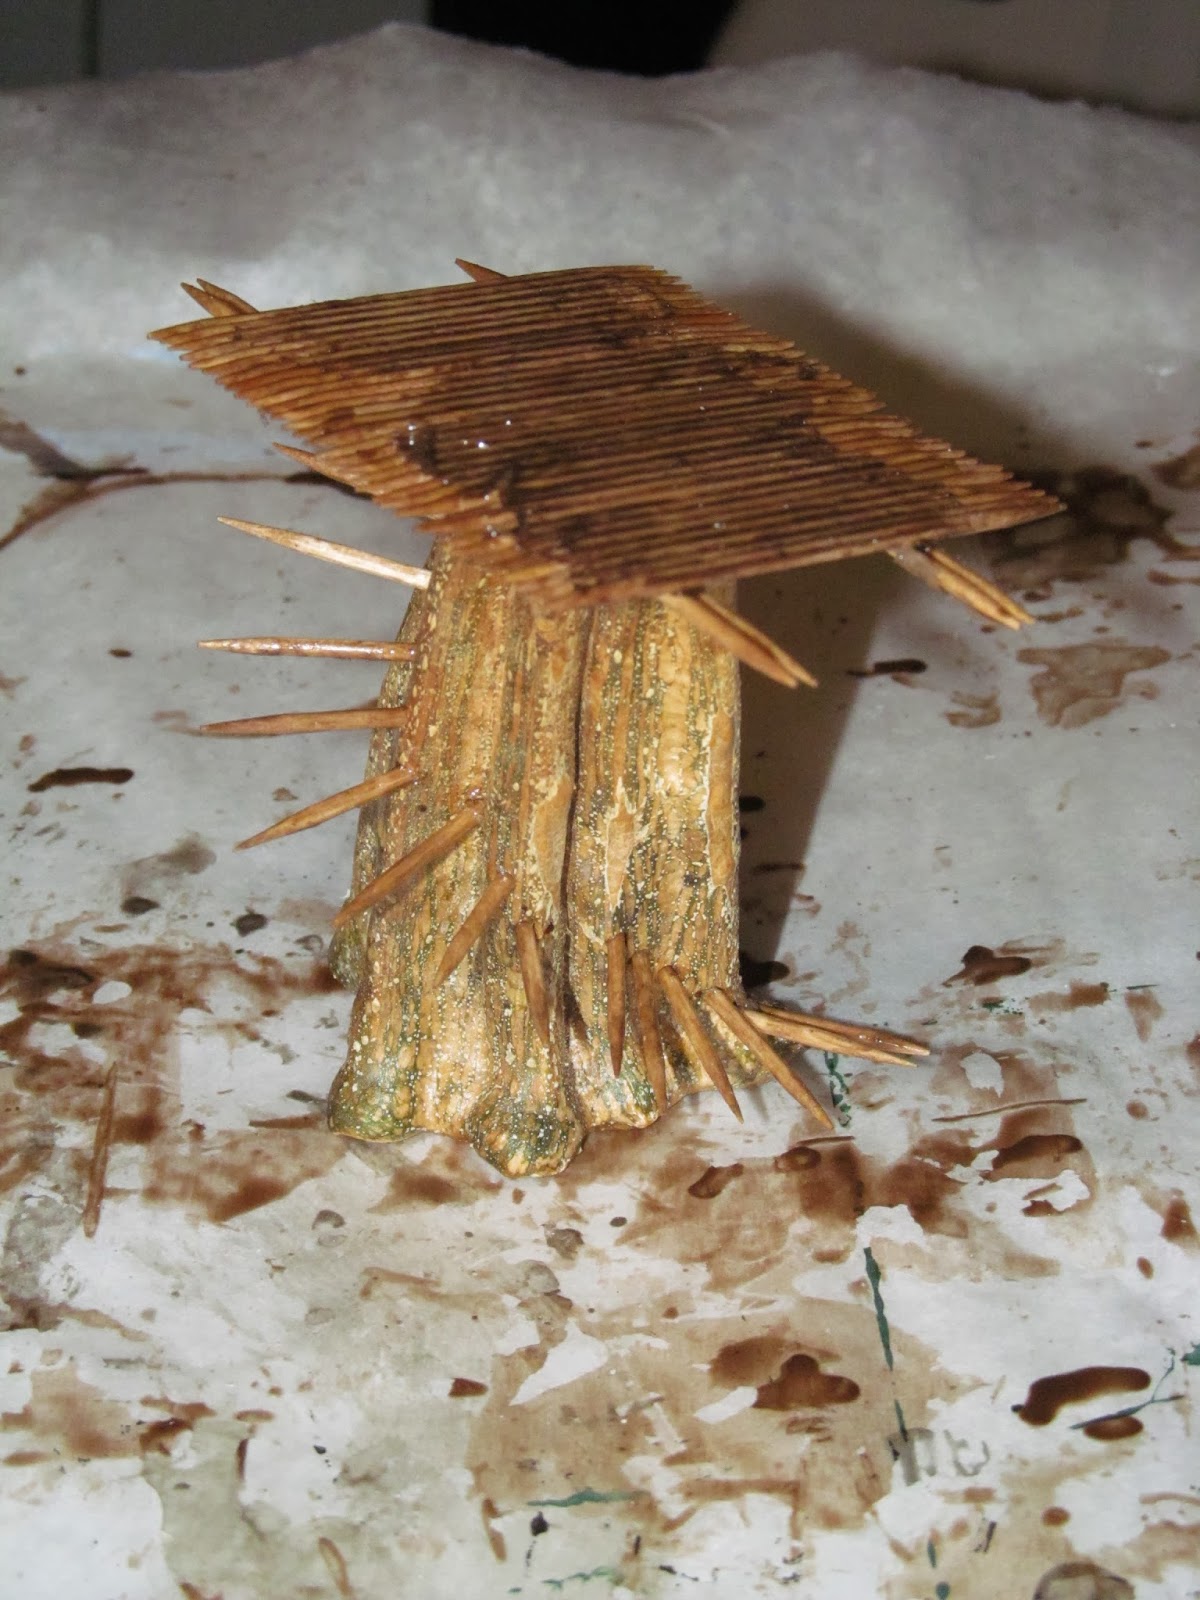
 |
| Close-up showing the marker points where I think the 'planks' should be added. |
As stated before, I am using round toothpicks to represent the spiked planks the Hobgoblins are using as stair steps. They will be left with the sharpened end, as a deterrent to attackers either climbing the tree trunk, or hoisting a ladder against its side.
 |
Here are the toothpicks, un-cut, ready to be hacked to size, and put into
position, as soon as the holes are drilled into the side of the 'tree' trunk. |
I am applying Royal Walnut Polyshades urethane-stain mix, to the unfinished toothpicks. This will both stain them (lightly), as well as seal them with urethane, against handling during games. They're super easy, and fast, to stain, and seal, all in a single step. I use school paint brushes to apply The Dip -- when done with a Dip'ing session, I just pitch the used brush in the trash, and grab another one, for the next session -- they come in a pack of 35 brushes, for around $1.00, at Wal-Mart, so no worries about expense.
 |
Drilled, and filled! The toothpicks have been cut in half, and inserted into the holes drilled
with a drill press, holding the 'trunk', by hand -- be careful you do not drill into your fingers!!! |
Once the urethane-stain cures, the 'planks' will be White Glued into the 'trunk'. I used a 3/32" drill bit, as it was very close to the diameter of the toothpicks I had. Be sure to hold the drill bit behind the toothpick, to see if it is a close match to the diameter of your round toothpicks -- do not guess, or you may be buying another pumpkin!
Speaking of pumpkins, it is possible to purchase multiple piece lots of pumpkin vines, off of e-Bay! On a whim, I visited their site, and searched for "Pumpkin vine"... I found quite a few auctions for them! Prices vary, wildly, but it is cheaper to buy a bag full of vines, than it is to purchase 8-10 pumpkins! Unless, of course, you really enjoy pumpkin... Pumpkin stems can also be used to make trees, for wargaming -- details can be found on DM Scotty's web site (he has a built-in search function).
After fitting the toothpick halves into the drilled holes, they were removed, and a stain-varnish has been applied. They are curing in a crockpot ($20 at Wal-Mart), on the Keep Warm setting (around 120 degrees F), for 40 minutes, which will fully cure the urethane stain application. I am also curing some Dip'ed figures in the same batch -- batch processing makes the most use out of a heating cycle, more bang for your electrical bill's buck.
While I am waiting for the Dip'ed bits to cure, I am also building the flat, platform top, which will be what the Hobgoblin troops will stand on, while they perform their guard duties. It is made out of the very same round, toothpicks, glued side-by-side, to form a flat platform. The toothpicks are arrayed into a square formation, on top of wax paper; School/White Glue is then applied to what will be the bottom side, with another layer of wax paper laid on top. The flat, vinyl floor tile base, with a layer of green craft foam applied to the tile's glue side (visible surfaces painted with craft paint, Hunter Green), is then laid on top of the second layer of wax paper. Then a small weight (a metal tape measure I was using to check for square size on the platform) is laid on top of the second layer of wax paper, to hold everything in place, and flat, until the Glue dries (I was planning to add this to the Dip'ed figures, and other toothpick sticks, in the crockpot, but there wasn't enough room; when the figures are fully cured, though, I will swap them out, and put the platform in, to speed curing/drying).
 |
Toothpicks arranged into a square formation, side-by-side, with White Glue. This will
form the platform base, upon which the guards will stand, at the top of the tree tower. |
 |
Here the foam-top base is laying on top of the toothpicks, with White Glue,
sandwiched between two layers of wax paper -- White Glue will peel off of wax paper,
quite easily, when dried, so it makes a perfect forming layer/release barrier. |
Once the platform is dried, it, too, will receive a stain/varnish coat, to seal, and protect it, from usage during the game sessions. After the base of the platform is completed (it will need cross-bar toothpicks to reinforce it, and to give it a more realistic structural appearance), I will use more round toothpicks, to build up the walls which will protect the Hobgoblin Guards, while they stand guard within the Tower. I have not decided whether to add a rooftop, as this will make it much more complex to build, and use (open tops make it much easier to pull figures out, as they are killed...).
 |
The 'trunk' has been completed, with the stained/varnished 'steps' glued into place. Here you
can see its size, as well, against the scale, with a 25mm Human figure standing beside the trunk. |
 |
Here is a shot of the top platform, which will be put atop the
trunk. This is the battle platform the Hobgoblins will use. |
Well... Ran into a couple of glitches: 1) Wax paper only works as a non-stick surface, with White Glue, when used for air-drying -- if you apply heat, it becomes just regular paper; 2) Applying heat to craft foam sheets, causes it to shrink, dramatically, but I also realized that the base size was entirely too small to allow me to add the spiked polls around the base of the 'tree', so the base needed to be replaced with a 6"-square, which solved a couple of issues...
Got the deck attached to the trunk. Still need to build the deck's walls, but it is nearing completion.
 |
| I will be adding a card stock hatch door, above the 'steps', to represent the means of egress. |
 |
| Side view of the tree trunk, and battle platform. It will hold two figures, on 1"-square bases, once the walls are added. For RPG's, that is two Hobgoblin Guards; in BattleSystem, those two figures represent 20 Hobgoblins -- either way, it works for me. |
Progress Update: 12-3-13.
Mounted the 'trunk' to the base; added spiked stakes surrounding the base of the 'trunk'. Next up will be adding ground cover to dress it up...
 |
The Stakes have been Hot Glued to the base (painted foam
attached to the glue side of vinyl floor tile piece, 6"-square). |
 |
| Another view showing the entrance to the 'step' up to the tower's platform. |
Hot Glue was used to form a ridge surrounding the line of stakes. This not only dresses up the row of stakes, but it also lends some additional strength to the stakes. The neat thing about working with Hot Glue, is that it fully sets within minutes, and it takes paint quite well, even though it is non-porous.
I will be building up some walls on top of the platform, and I will add a hatch to the floor of the platform, to provide access, as well as protection, to the platform.
Not shown, is the fact that I applied some additional Hot Glue to the underside of the platform prior to attaching it to the 'trunk'. The addition of some Hot Glue reinforced the platform structure. Since the Hot Glue was added to the underside, I was able to keep it hidden so that it will not detract from the aesthetics. Cheers!
Progress Update: 02-18-14.
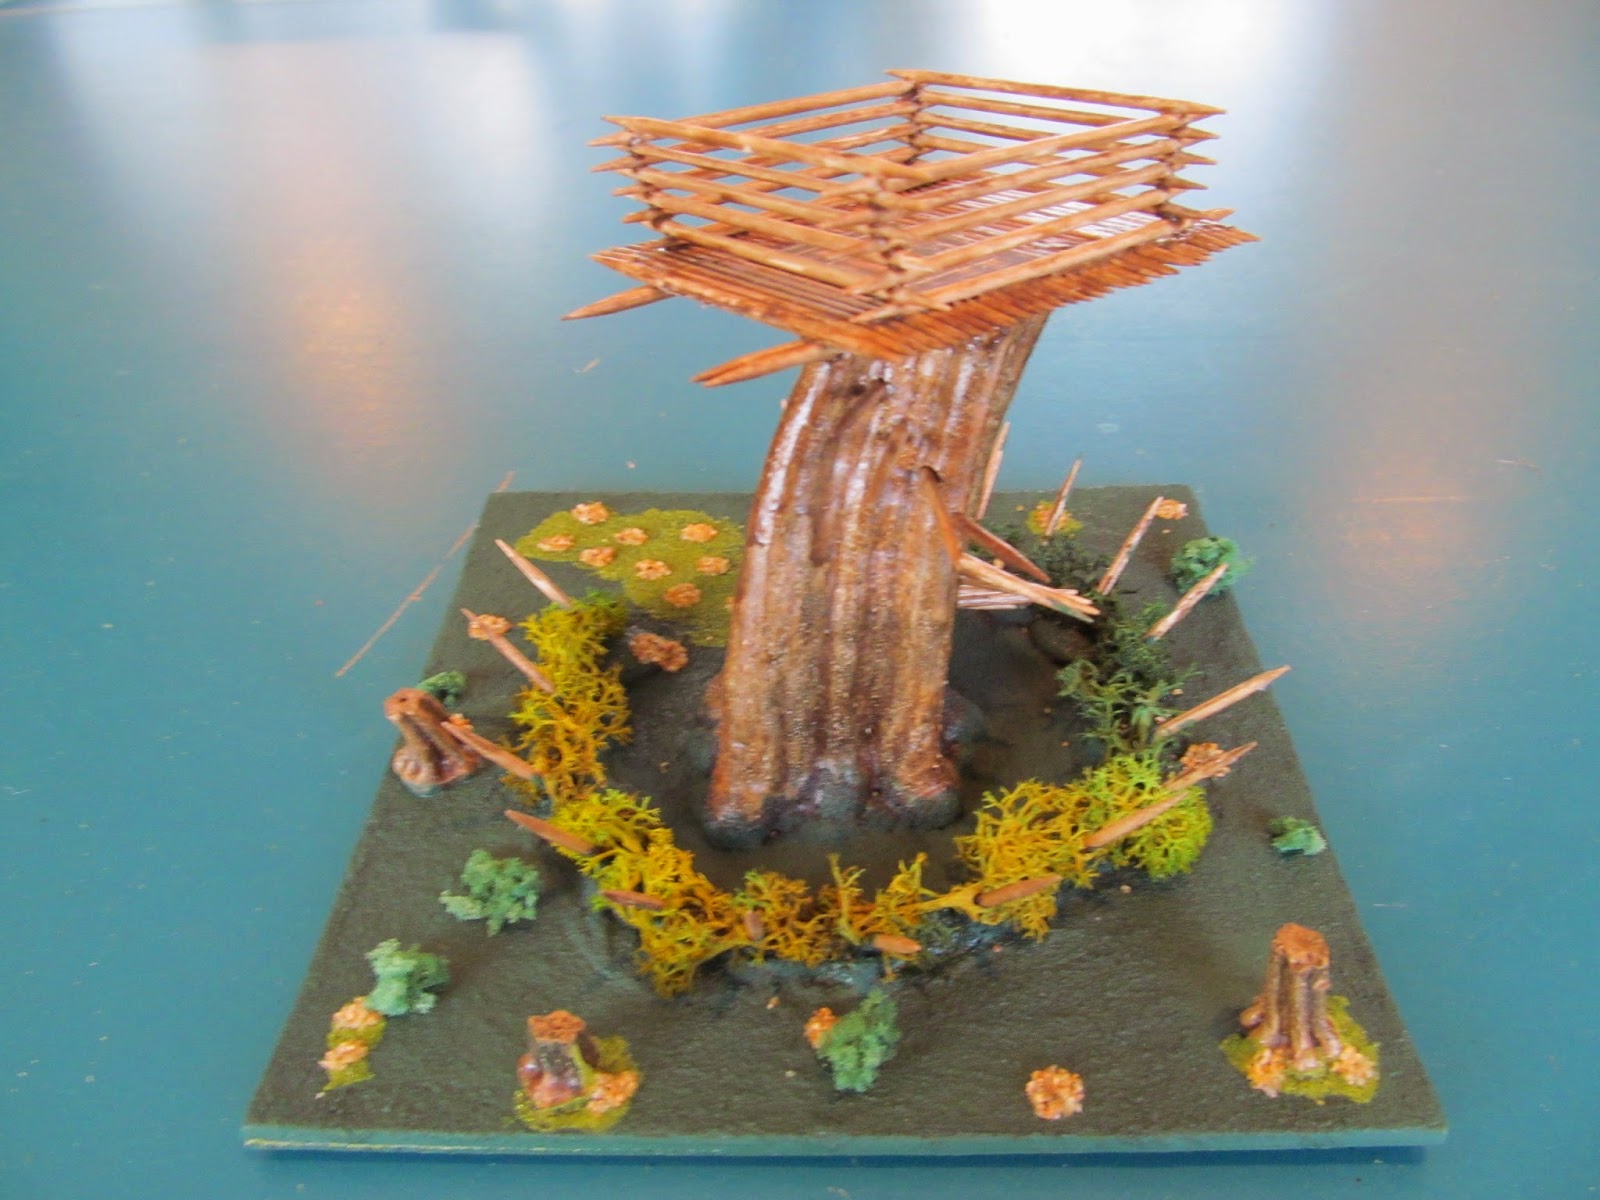
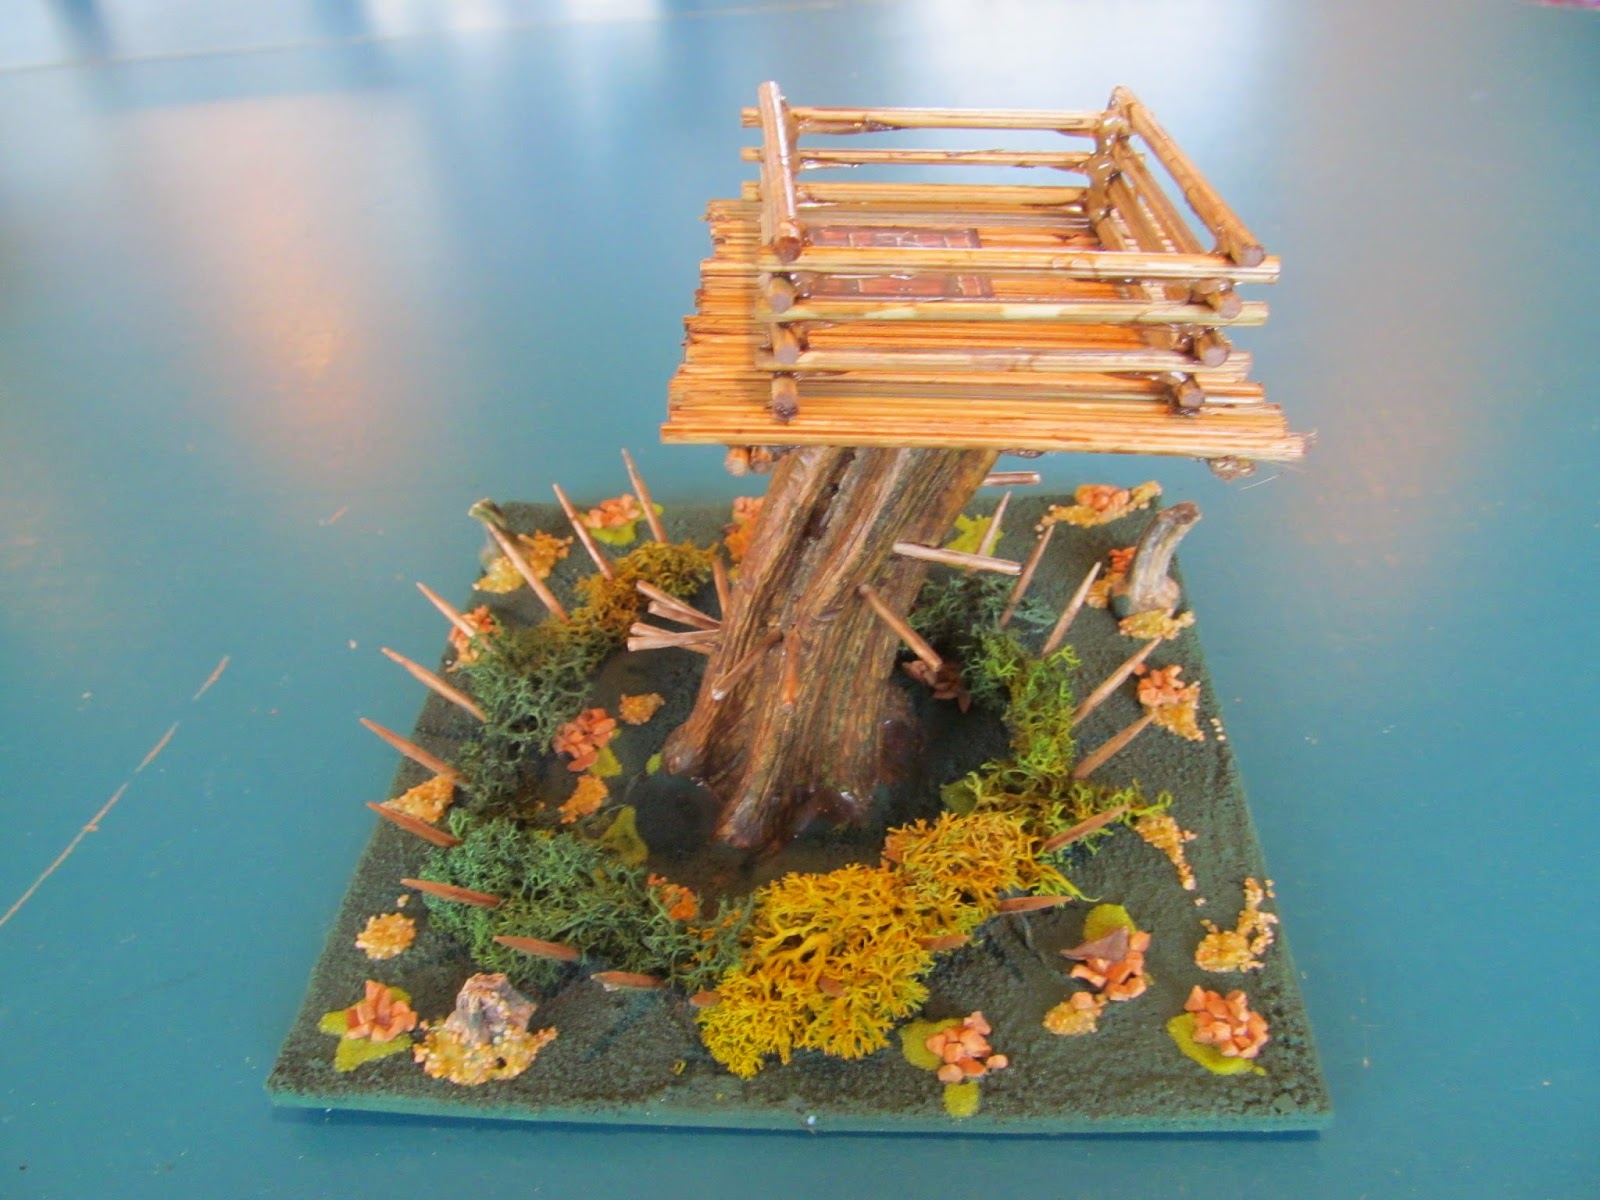
Here is the finished, prototype model, with lichen added around the sharpened wooden stakes. For gaming purposes, the lichen represents thorn bushes. The thorn bushes won't stop an armored warrior from penetrating the perimeter of the tower, but it will slow them down just a bit; for the unfortunate warrior who is not protected by leg armor, slogging through the thorn bushes, would be painful, and would cause at least mild wounds, tearing open skin, and doing other nasty hurtful things...
I bid on a lot containing a total of 11 additional pumpkin stems, of similar size. I have 11 additional Watch Towers, nearing completion. The wooden fort, at the top of this page, will have ample Guard Towers surrounding it, to give it plenty of advance warning of an attack! Cheers!
 |
| Hobgoblin Archers manning their advance Guard Tower. You can see, on the right, one figure "climbing" the tower's ladder sticks, making his way to the top, to relieve one of his tribesmen of duty, while two others watch from the ground. |
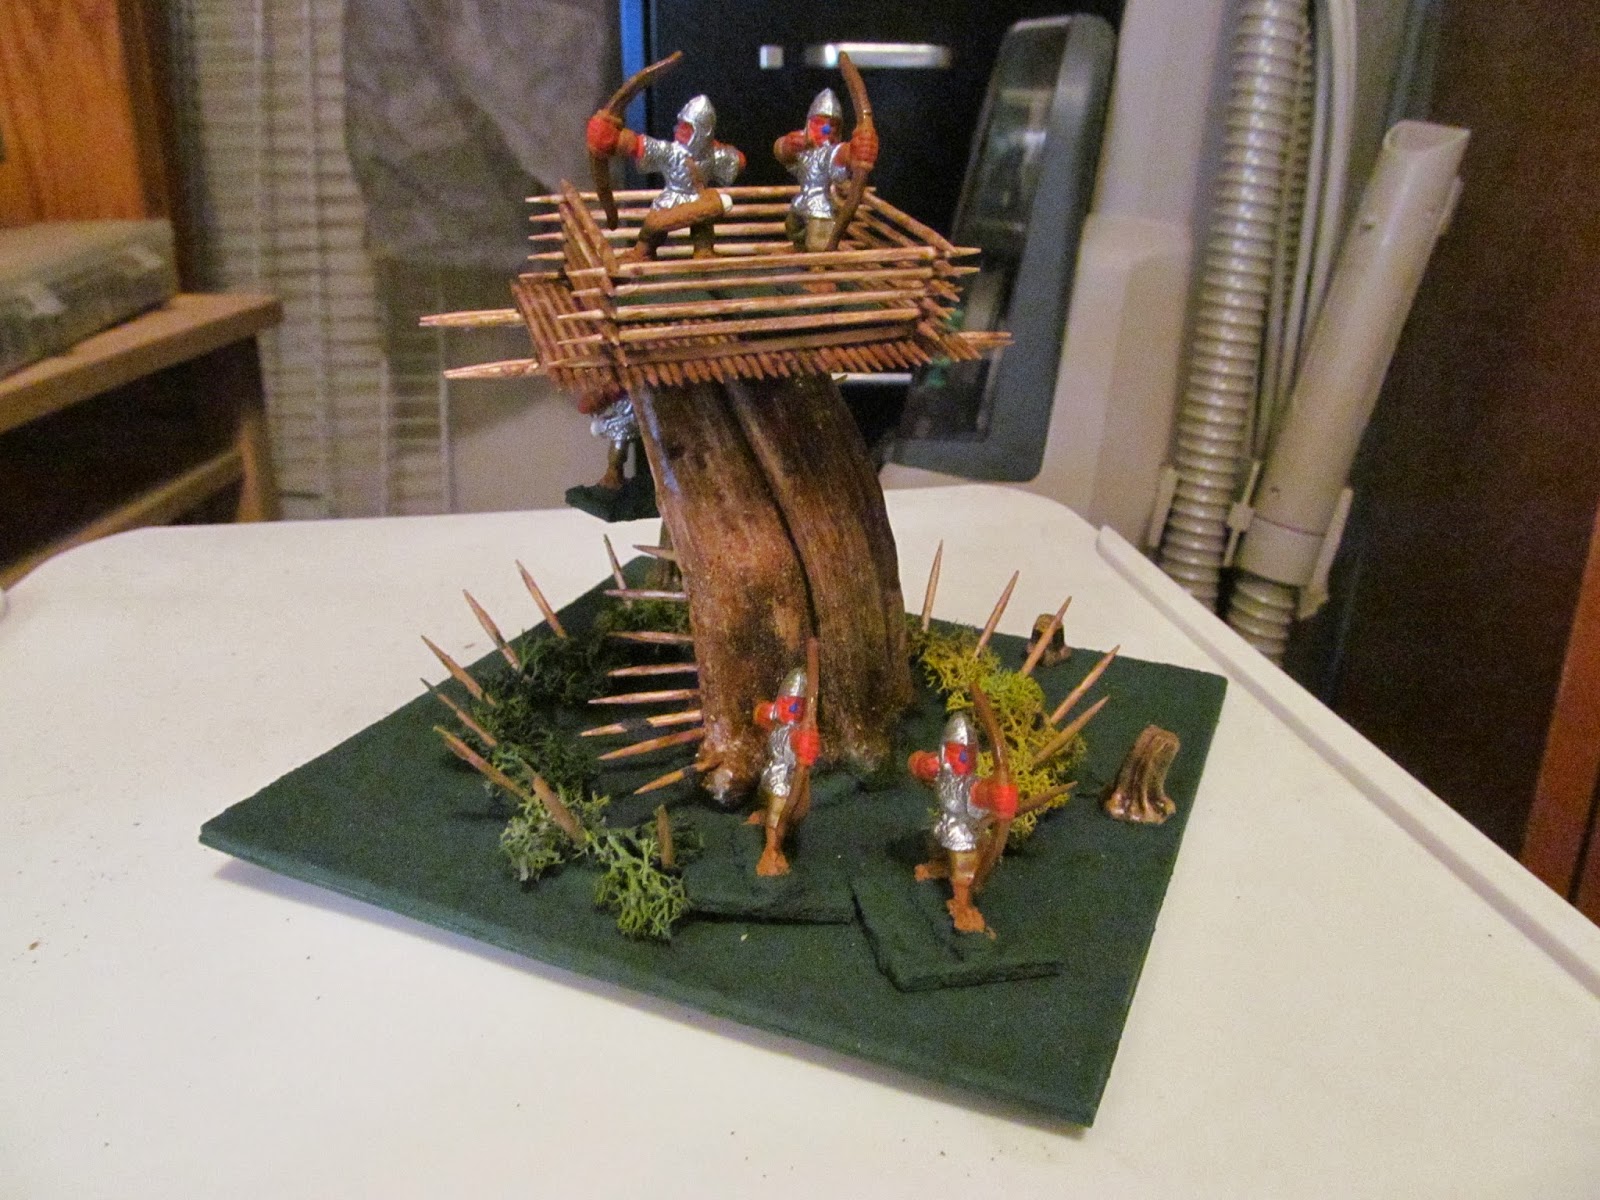 |
| Two Hobgoblins stand guard, at the entrance to the base of one of their many Guard Towers, surrounding their wooden fort. One of their tribesmen is climbing to the top, around the left side of the Tower, to relieve the two Guards up top. |
 |
The green color of the thorn bushes belies their hurtful welcome to any who would try to cross through them to reach the base of the Tower. Smaller, younger trees have been cut down, so as not to interfere with the view from the platform (left corner in this photo, right side in the photo above, and three stumps can be seen in the top photo in this group).
|
Progress Update: 3-28-14.
Here are additional photo's (several of them...). I detailed the bases with sand, gravel, and some shrubbery. Check out the four additional Towers completed, as well. I have a total of 11 Towers, with five of them completed, and the other six at around 80% finished.
 |
| Prototype 1F. |
 |
| Prototype 2F. |
 |
| Prototype 3F. |
 |
| Prototype 1S. |
 |
| Prototype 2S. |
 |
| Prototype 3S. |
 |
| Prototype 4S. |
 |
| Tower 2A. |
 |
| Tower 2B. |
 |
| Tower 2C. |
 |
| Tower 2C. |
 |
| Tower 2D. |
 |
| Tower 3A. |
 |
| Tower 3B. |
 |
| Tower 3C. |
 |
| Tower 3D. |
 |
| Tower 4A. |
 |
| Tower 4B. |
 |
| Tower 4C. |
 |
| Tower 4D. |
 |
| Tower 5A. |
 |
| Tower 5B. |
 |
| Tower 5C. |
Perspective Shots of the newer Towers: 04-04-14
 |
| Tower 6 |
 |
| Tower 7 |
 |
| Tower 8 |
 |
| Tower 9A |
 |
| Tower 9B |
Project #3: Oatmeal Box to large City Gate, using Fat Dragon Games' Keep PDF pages, 12-05-2016:
I've been eyeing this Quaker Oatmeal box since I saw it on the grocery store shelf, over a year ago... I bought it both for the oatmeal, and the box, planning to wallpaper it with FDG's castle pages, to create a very tall, city gate model, for my fantasy tabletop war games. I finally emptied the box, so the project could begin...
Here is the box, in the beginning, with the portcullis door pasted in place. I used matte Mod Podge, applied, and spread around, with a disposable brush, followed by burnishing, with my hand.
Here you can see how I've pasted on different pieces from the FDG set, using the Gate pieces on the lower portion, with Tower pieces used for the upper stories. They do not match up perfectly, but for me, they are close enough. At arm's length, most folks will not notice the mismatches -- I hope!
Here is a view of the front, and the side with the access door, which leads to the wall sections, which will butt against the wall. The door is a bit too low, but not low enough to warrant a lot of work to fix. It will be good enough for my tabletop...
Another view of the tower side. The top will require some work, but right now, I am focusing on the wall sections. The top will be a chore, but it will be achievable. Stay tuned for more updates!


Thumbs up for the wonderful idea!
ReplyDelete