

7-12-2023:
NOTE: vinyl floor tile bases warp, over time, with PVA Glue used to apply texturing using colored sand mixtures, rendering them useless. I ended up replacing nearly all of my vinyl floor tile bases due to warping. I now use laser-cut MDF bases exclusively... I order my laser-cut MDF bases from e-Bay sellers, as well as Etsy and Amazon sellers -- whoever has what I need, at the lowest prices when I need them.
#1 - Movement Trays:
For a recent BattleSystem game, I needed to have some movement trays for my 108 figure, Goblin army. With that many figures, albeit divided into 12-figure units, I wanted to have an easier way to move them about the table. After reviewing many different tutorials on the subject, I wanted something simpler, and less expensive. Here is what I came up with:
 |
| Finished(?) product -- almost... Read on to see how I did it, and why I changed it from what is shown. |
 |
| Components of the movmement trays: two pieces of black, vinyl floor tile; green foam sheets,; and the Goblin figures this tray will be used for, in BattleSystem games. |
For a top surface to set the figures upon, I cut a green craft foam sheet to match the sizes of my movement trays. I then peeled off the paper backing on the floor tiles (after cutting them to size), and applied the foam sheet. Make sure to press the entire surface to bond the foam to the floor tile. In retrospect, I would suggest applying the green foam sheet to the uncut floor tile, first, then cut them to the sizes needed, as this will yield better edges on the finished trays.
 |
| The foam sheets did not come out as an exact match to the floor tile sections, so trimming was necessary after affixing them to the tiles. |
Since I was building movement trays for troops which can only be of Irregular Formation (not disciplined enough to stand shoulder-to-shoulder, in combat), I needed to have some space between each figure. To accomplish that, I cut foam sheets into 1/8" wide strips, and glued them down.
 |
| 1/8" wide strips of foam,glued using PVA/White Glue. This maintained the necessary gaps between figures, as prescribed by the BattleSystem rules, for Irregular Formation Troops. This led to some problems, though, as the figures' bases were not perfectly uniform in size, so inserting them into the tray's rows, proved difficult, after they were removed, since I did not put them back in the exact same place, each time I used the trays... |
After the spacing strips were dried, I tried putting the figures back onto the trays, but I discovered that since the figure bases were not perfectly uniform in size, they would not fit again. Because the Goblin figures had roughly 20mm square bases, these trays could only be used with figures having the same base size. That meant that they could only be used with a limited number of figure types. I would have to create movement trays for each base size used within my 2e BattleSystem games -- that would mean a number of different sizes, and types, of movement trays, which would need to be kept with their figure types, only...
 |
| Hunter Green craft paint applied to the tops, to cover up the PVA Glue, and to help them blend into the tabletop better; the edges were painted black to help them disappear/blend in better. On thin bases, applying black to the edge, will create an optical illusion such that the edge seems to almost disappear. It does not work on thicker, GW-type, bases, however. |
I ended up removing the separating strips, which left unsightly glue strips on the foam. Secondly, the foam was a much brighter green, than the indoor/outdoor carpet I use to cover my ping pong table used for my miniatures gaming. The solution was to paint the foam with Hunter Green craft paint, which covered the glue nicely, as well as making the trays blend in with my tabletop. By removing the separation strips, the movement trays could be used with any figures which would fit on them: Regular Formation Troops (standing shoulder/base-to-shoulder/base), as well as Giant type figures, with larger base sizes.
This technique can be used to create movement trays of whatever sizes are needed. They will support quite a number of 28mm metal figures, however I would not recommend using them to carry more than around 30 figures, as the vinyl floor tiles can flex. If they curl, just flex them to make them flat again (be sure to store them flat, stacked, on top of each other, is ideal, to help them maintain their flat shape). The shiny, finished side (on the bottom, in this application), is quite durable, and they will slide across the table surface very easily, during the game. Cheers!
 |
| Multiple movement trays, drying, with impatient Goblins ready to move into battle, standing nearby. Whatever size you need, vinyl floor tiles can be cut to size -- as long as you don't need something larger than 12"-square! |
7-12-2023:
Order laser-cut MDF squares for the project, below. The vinyl floor tiles will warp, severely; the MDF will not. All techniques shown will work with MDF.
#2 - Three Dimensional Figure Stands
for Flight and Swimming:
I purchased this product, from RPGNow.com, for use with
some undersea gaming I had planned: http://www.rpgnow.com/product/80714/Three-Dimensional-Combat-Solutions?
term=Three+dimen. The product works well, as designed, but I found some inexpensive ways to improve it,
dramatically. I also discovered that I could adapt the concept to represent airborne figures for 2nd
Ed. BattleSystem games. Here is a breakdown of what I did...
The instructions call for using plywood/wood for the raise-able platforms. I thought that would be extremely heavy, and it would tip over too easily. I commonly use vinyl floor tiles, the peel-n- stick variety, for figure bases, and I realized that I could apply the watery printout to the tile, to use as the adjustable platform. I epoxied the mini-clothes pins to the tile, and then I stacked the 4" square floor tiles together, before I drilled out their center holes. They are light-weight, work perfectly, and they prevent the stands from tipping easily. I also dressed up the sides of the plywood bases by applying black craft paint to the sides.
The wooden, mini-clothes pins, are available at most hobby stores. They are inexpensive, and they work superbly. Just be careful when you epoxy them to the underside of the floor tile piece -- you do not want to epoxy them shut!
The sandy bottoms were printed on cardstock, then I glued them using PVA/white glue. Simple, and effective. Just be sure to smooth them out.
The sticks can be inserted into the 5/16" holes you have drilled into the plywood bases (5/16" diameter dowels), making them detachable, or they can be glued (meaning they cannot be pulled out, for transport...). I chose to glue mine, as I do not plan to transport them from house to house, but if you do not glue them, they will eventually become loose, as the hole wears itself bigger. Either glue them, at that point, or wrap some masking tape around the base of the stick, to make it bigger -- a temporary fix, but serviceable.
The sticks are shown without depth markings. The product comes with printed depth markings, in both white and blue, which can be glued with PVA, around the dowels. I have not used that, as I plan to paint the sticks, in 1" increments, with alternating colors. That way I can vary the depth, as needed. For example, in our Red Baron games, we use a very similar stick set-up. The altitude represented on the sticks, is variable, such that we can declare the bottom of the stick to be 10,000 feet, if we are really flying high; then, when the battle descends to a lower level, say under 5,000 feet, we declare that the bottom of the stick (the base) represents the bottom altitude level, say 2,000 feet, 1,000 feet, or actual ground level, as needed. The same concept can be applied to these sticks, and their bases: the sandy bottom can be the bottom, or it can represent 500 feet of depth, 1,000 feet of depth, or whatever depth is applicable to your game.
To paint your sticks for different depths/altitudes, wrap them with 1"-wide masking tape, every inch, then paint the color of your choice. This will give you alternating, 1"-wide, bands of color, to use to count off vertical intervals (height and/or depth), as needed. Leaving the masking tape in place, is possible, but it will degrade with time, as you slide the clothes pins up and down the length of the dowel, so paint is a better, thinner, option.
To adapt these for use as aerial elevation markers, for your air combat situations, whether historical, or fantasy games, just replace the base's cover with an appropriate ground image (say, an image of grassy ground, perhaps with some rocks?), and replace the floor tiles' water image, with a white image (the PDF includes a black grid, on a white background, so this is quite easy to do).
These stand designs can also be adapted for use to show airborne/flying creatures, both in RPG's, 2nd Ed. BattleSystem games, and other games, like Red Baron WWI aerial combat games. Best of all, these flight stands are simple, inexpensive, and easy to make.
 |
| The mostly finished product (still need to mark the stick for elevation levels...). |
The instructions call for using plywood/wood for the raise-able platforms. I thought that would be extremely heavy, and it would tip over too easily. I commonly use vinyl floor tiles, the peel-n- stick variety, for figure bases, and I realized that I could apply the watery printout to the tile, to use as the adjustable platform. I epoxied the mini-clothes pins to the tile, and then I stacked the 4" square floor tiles together, before I drilled out their center holes. They are light-weight, work perfectly, and they prevent the stands from tipping easily. I also dressed up the sides of the plywood bases by applying black craft paint to the sides.
 |
| This shows the base, on the left, and the adjustable "floor", upside down, demonstrating that it is a vinyl, peel-n-stick floor tile, cut down to 4"-square. |
The wooden, mini-clothes pins, are available at most hobby stores. They are inexpensive, and they work superbly. Just be careful when you epoxy them to the underside of the floor tile piece -- you do not want to epoxy them shut!
The sandy bottoms were printed on cardstock, then I glued them using PVA/white glue. Simple, and effective. Just be sure to smooth them out.
The sticks can be inserted into the 5/16" holes you have drilled into the plywood bases (5/16" diameter dowels), making them detachable, or they can be glued (meaning they cannot be pulled out, for transport...). I chose to glue mine, as I do not plan to transport them from house to house, but if you do not glue them, they will eventually become loose, as the hole wears itself bigger. Either glue them, at that point, or wrap some masking tape around the base of the stick, to make it bigger -- a temporary fix, but serviceable.
 |
| This view shows the printed surface, which is used for miniatures. The watery "floor" was printed on cardstock, then the wax paper was removed from the floor tile piece, and the cardstock was applied to it. When drilling the center holes on the floor tile pieces, I recommend stacking as many as you are making, together, then drilling them all at once -- a drill press is quite handy for this task... |
The sticks are shown without depth markings. The product comes with printed depth markings, in both white and blue, which can be glued with PVA, around the dowels. I have not used that, as I plan to paint the sticks, in 1" increments, with alternating colors. That way I can vary the depth, as needed. For example, in our Red Baron games, we use a very similar stick set-up. The altitude represented on the sticks, is variable, such that we can declare the bottom of the stick to be 10,000 feet, if we are really flying high; then, when the battle descends to a lower level, say under 5,000 feet, we declare that the bottom of the stick (the base) represents the bottom altitude level, say 2,000 feet, 1,000 feet, or actual ground level, as needed. The same concept can be applied to these sticks, and their bases: the sandy bottom can be the bottom, or it can represent 500 feet of depth, 1,000 feet of depth, or whatever depth is applicable to your game.
 |
| Here is the underside of the plywood base. I applied black craft paint to its side, to make it look better on the tabletop. The bottom was left unfinished, as no one will normally see it. |
To paint your sticks for different depths/altitudes, wrap them with 1"-wide masking tape, every inch, then paint the color of your choice. This will give you alternating, 1"-wide, bands of color, to use to count off vertical intervals (height and/or depth), as needed. Leaving the masking tape in place, is possible, but it will degrade with time, as you slide the clothes pins up and down the length of the dowel, so paint is a better, thinner, option.
 |
| Here is a look at the devices in use, from a more top-down view. The bottom is represented by a cardstock printed, sandy surface, which is included with the PDF product. This allows the option of having some creatures walking on the bottom, while others swim above them. |
 |
| Here is a side view. You can clearly see how depth is represented, and how it can be used within a game to represent true, 3-D combat. The vinyl floor tiles are flexible, but stiff enough to work in this application. They will easily hold more than four metal figures, without flexing. They work well, and they can aid players, and GM's, alike, when dipping beneath the surface, or soaring in sky! |
To adapt these for use as aerial elevation markers, for your air combat situations, whether historical, or fantasy games, just replace the base's cover with an appropriate ground image (say, an image of grassy ground, perhaps with some rocks?), and replace the floor tiles' water image, with a white image (the PDF includes a black grid, on a white background, so this is quite easy to do).
These stand designs can also be adapted for use to show airborne/flying creatures, both in RPG's, 2nd Ed. BattleSystem games, and other games, like Red Baron WWI aerial combat games. Best of all, these flight stands are simple, inexpensive, and easy to make.
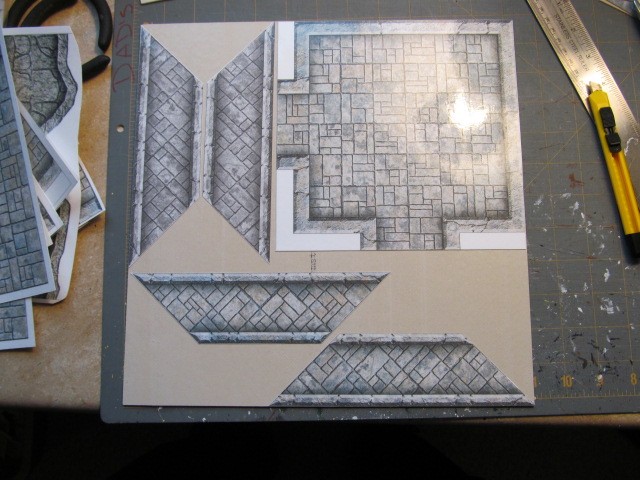
#3 - Basing Copper Dragon Dungeon Floor Tiles:
I deliberated on whether to jump in on the Dwarven Forge KickStarter for a while, but I realized I would want around 10 sets (!) to do what I wanted with it... Even with the add-on's, I would still need to purchase at least five complete sets, to get enough pieces for the capacity I desired.
I did the math, and I realized that for considerably less cash, I could go 2-D, with Fat Dragon's Copper Dungeons/Caverns sets, with all the advantages of 2-D:

- Greatly reduced cash investment;
- A small fraction of the weight, and volume for the same dungeon/cavern square footage;
- If curling occurs, just flex them the opposite way, then press them flat on the tabletop;
- If laminated with clear contact paper, they can be marked with overhead/wet-erase markers, as needed, to show Secret/Concealed Doors, or other features and hazards;
- Can be customized much easier;
- No issues with figures' weapons/arms crashing into walls/doors, as everything is 2-D, so no walls cramping the figures
I hit upon the idea of using peel-n-stick Floor Tiles as
a base material, which I had previously used to make custom bases for my miniatures (another story, but continued
here -- read on about how I plan to use my cut-off's from the Copper Dragon pieces...). I
also used clear contact paper to laminate my Copper Dragon Dungeon pieces. I had glossy,
clear contact paper, so I used that, since I did not have any of the matte clear contact paper at hand. This
has a distinct advantage: the glossy contact paper will allow me to use wet erase markers with less of a
chance of permanency, as the glossy finish is easier to erase markers from; the matte clear contact paper tends to
'absorb' the inks more than the glossy coating.
 |
| Peel -n-stick vinyl floor tile: pattern does not matter as this side will be down all of the time the tile pieces are in use. |
The peel-n-stick floor tiles were on sale, at my
local DIY, Menards Store: $0.26/square foot piece, or $11.46 per box of 45 (this was the sale
price, at the time; regular price is more like $0.37/square, or $16.65 per box of 45 tiles)! To make this
work, I first measured, cut, and applied, the clear contact paper to the Copper Dragon
Dungeon pieces. By measuring, and cutting, then applying, and burnishing the contact paper, I was
able to minimize the waste. Burnishing the contact paper to the cardstock 2-D printouts, is critical, so do
this carefully, so as to avoid wrinkles, and air pockets.
Once the contact paper is applied, I cut them with a
maximum border of 1/4", to allow me to more easily trim them, after they are applied to the floor tiles. When
applying the laminated dungeon tiles, care should be taken to minimize waste, even though I plan to use the cut-
off's to make figure bases, I still ended up with 2-3 lifetime's worth of basing materials...

The photo above, show the laminated dungeon tiles, before
they were properly trimmed. This next photo shows two dungeon tiles arranged to maximize usage of the floor
tile:
 |
| Two dungeon tiles applied to the floor tile's glue side, and burnished with a kitchen roller pin, to smooth them out, and ensure they are properly adhered to the floor tile base. |
 |
| Here we see the two dungeon tiles cut from the floor tile, using a utility scissors -- much easier than using a razor knife and a metal ruler... I started with the razor knife and ruler, but it proved far too tedious, and too much strain on the hands, as I had a lot of tile to cut, and it would take too much effort, and far too much time to make all of those cuts... |
 |
| Here is an example of using floor tile cut-off's to form a custom base. Two pieces of floor tile were adhered, glue sides together; they were then trimmed to form a square; the wooden dowel used to support the Beholder figure was then Hot Glue'ed to the base, and it was painted matte black. The Beholder is another topic for my blog, on how I made this figure from inexpensive craft materials. I plan on forming a small 'army' of the floating monsters, for an Underdark game... |
Here is another shot showing how different laminated
dungeon pieces can be arranged on the 12"-square floor tiles, to maximize the number of pieces based from each
tile.
 |
| Various dungeon tiles arranged on a 12" floor tile with minimum waste. |
Here are some photo's of the finished,
mounted Copper Dragon Dungeon, and Cavern tiles. It is just a thrown-together
dungeon, to see what I could put together with the pieces I have, currently. By laying them out to see what I
could make with them, I learned what pieces I need more of. Good thing I bought two boxes of floor tiles,
because I already see numerous pieces I will need more of...
 |
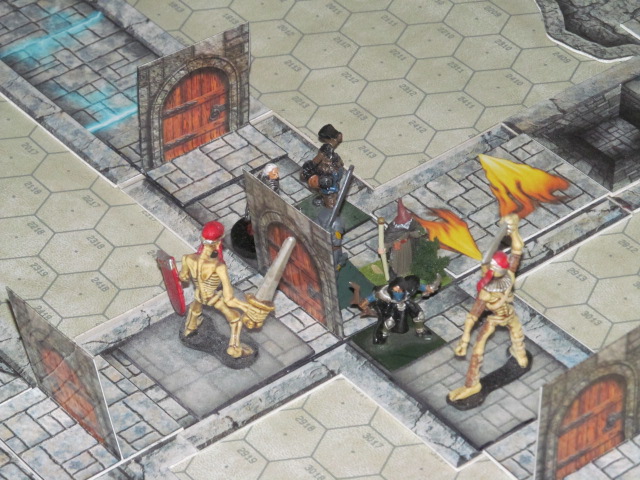
| A large room, with stairs leading down to the next level of the dungeon. Unfortunately for the adventurers, it is guarded by five Giant Skeletons. |
 |
| Here is another view. You can see the Plexi-Glass bases used for the Giant Skeletons. The glossy Plexi-Glass has been matte clear coated, which allows the dungeon tiles to show through. This is my preferred basing technique, but since I have so much of the floor tile cut-off's, I've decided to use that, instead, painting it black. The black shows the area of control for each figure, so I don't mind it; using green would make the figure look even more odd, IMO, in the various terrain surfaces I will be using the figures on: castle catwalks; drawbridges; stone bridges; forests, swamps, etc. |
 |
| This Hill Giant figure is actually a 54mm Cave Man figure. I picked up a bucket of Cave Men figures, along with dinosaur figures, for around $10, several years ago, at Wal-Mart. These Cave Men figures are currently available on Amazon.com. They paint up quickly, and easily, and they match, both in style and size, a set of Grenadier Hill Giant figures I purchased back around 1982! |
 |
| These two Stone Giant figures come from two companies: Reaper, on the left on a clear base, and the one facing the two adventurers, is an older figure from Mega Miniatures (OOP), purchased several years ago. They are close enough in size, and style, to go together. They will be used in a BattleSystem Skirmish game I have been planning to run for several years now. I finally finishing the terrain pieces needed for the dungeons, and caverns required for G1 Steading the Hill Giants fortress, with work still to come on the glacial terrain for G2 The Frost Giant Jarl module. Haven't decided whether to go strictly 2-D, or work on another project for 3-D caverns... |
 |
| Here is a shot showing some of the hazards included with the Dungeon Perils 1 set: lightning bolts/Glyphs of Warding (lightning); flame jets/Glyphs of Warding (fire), along with metal blades shooting from the walls to catch the unwary. There are other tiles which can be dropped on top of the regular floor/hallway tiles to show the traps after they have been sprung on the adventurers... |
 |
| Thought I'd throw together a large cavern area, to see what pieces I need to make yet. This array clearly shows me some of the pieces I will need to make to form better cavern terrain areas. I thought a confrontation between my Copper Dragon figure conversion, and my home-made Beholder would be something to make people laugh. |
 |
| Now this would be interesting -- if only for a couple of rounds... It would be fun to see who would do what to whom, and how it would end... |
 |
| Another view showing the two different Stone Giant figures, and their very different bases. |
 |
| Here you can see the matte clear coated bases of the Giant Skeleton figures. They were matte clear coated on both sides, which tends to make them opaque. It is better just to lightly clear coat the top side only (see below). |
 |
| A good close-up view of the Stone Giant's base. I got impatient, and I glued him to his base before I applied the Dip -- patience is most definitely a virtue... |
 |
| I think I made too many hallways, T-intersections, etc. This is a 9-foot by 5-foot ping pong table, which is nearly covered entirely, with dungeon tiles! It really drives home the size of most dungeon complexes: they look so small on a piece of graph paper... |
It is possible to use tape to connect the floor tiles
together, to avoid knocking them apart during play. Tape can be applied either to the bottom of the tiles, or
to the top, contact paper laminated, surfaces. I would recommend applying the tape to the bottoms, though, as
the floor tile surface is meant to be walked upon, with shoes! That surface is actually quite durable, and
chemical resistant, should you need to remove any glue residue.
 |
| Remember, the tile surface will be down, so it really does not matter what the design is. Buy the cheapest floor tiles you can get, and have at it! When they are on sale, they can be very inexpensive ($0.26/square foot, or less). |
For the pieces made thus far, and shown in the photo
above, I burned through 1-1/2 Color Ink Cartridges ($27 each) on my HP inkjet printer, as well as 1-1/2 Black Ink
Cartridges ($20 each), as well as a considerable amount of white, 110# cardstock. I burned through roughly 50
floor tiles ($13), for a total of roughly $83.50 plus a few dollars worth of cardstock.
7-12-2023:
NOTE: I no longer use vinyl floor tiles for this purpose. They warp too severely. I have switched to using 3mm thick cardboard, available at framing shops like Michael's Hobby and Craft Stores. I also use Wood Glue to attach square wooden dowels inside the long wall sections of towers and castle walls and gatehouses; even the cardboard will warp, over time, but the wooden dowels, do not, even after 5+ years!
I love card stock buildings, for my fantasy miniature games! Problem I have had, though, is that they get trashed during the game, and afterwards, when I store them -- mine tend to be far too delicate, and any mishandling seems to damage them very quickly.
Granted, they are only made of paper, but the ink is not cheap! I also put a lot of hours into assembling them, perhaps even basing them. All of that hard work goes into the trash after a building gets crumpled, smashed, or bent, when being handled... Arrrgh!
To preserve my works (time, effort, money), I decided to experiment with using vinyl, peel-and-stick, floor tiles. I had already used them to back card stock floor tiles, for my dungeons, so it was not much of a stretch to apply the same concept to 3-D buildings.
While there is no cosmetic difference produced by this method, it does dramatically strengthen the buildings, as well as giving them considerable "heft" -- they won't blow over with a slight wind after being reinforced with vinyl tiles! Here is the procedural process, step, by step... Cheers!
Step 1: Measure the inside dimensions of the walls, floors, ceilings, etc., of the structure, and then subtract 1-2 mm. Cut your vinyl floor tile pieces to match the measured sizes, then lay them over their positions, on the card stock, to verify they are the correct size. A millimeter, or two, of free space, on three sides, is acceptable; make sure you position the vinyl piece against the supporting edge (floor), when you check that it is cut to the correct size.
Step 2: Dry fit your card stock model together, and decide which glue tabs you will keep, and which you will need to cut off, to allow access with your Hot Glue Gun (used to adhere corners of the vinyl floor tiles, within the structures -- this is what creates the strength, holding the floor tile 'skeleton' structure together).
Step 3: Assemble your building, as you normally would, with PVA Glue, or whatever glue you prefer. Let the assembled building dry for as long as necessary, before moving on to the vinyl floor tile installation, in the next step.
Step 4: Do a dry fit, with the vinyl floor tile pieces, for each wall, floor, etc. Then peel off the wax paper from the glue side of the tile pieces, and install them, one by one, pressing them into place, attaching them to the inside of the paper walls, ceilings, etc. Be sure to position the vinyl tile pieces at the supporting edges (bottoms, usually) of the structures, realizing that the Hot Glue applied in the next step, will shore up gaps between the tile pieces, eliminating flexure.
Step 5: Now, having made sure the vinyl tile pieces are fully attached to the card stock sections, use your Hot Glue Gun to inject molten plastic Glue into each join: floors, walls, ceilings, etc. Let it cool, and set up, fully. Trim any excess Hot Glue, as necessary. Then set your finished model upright, and check your work.
Step 6: Move on to your next building, or project...
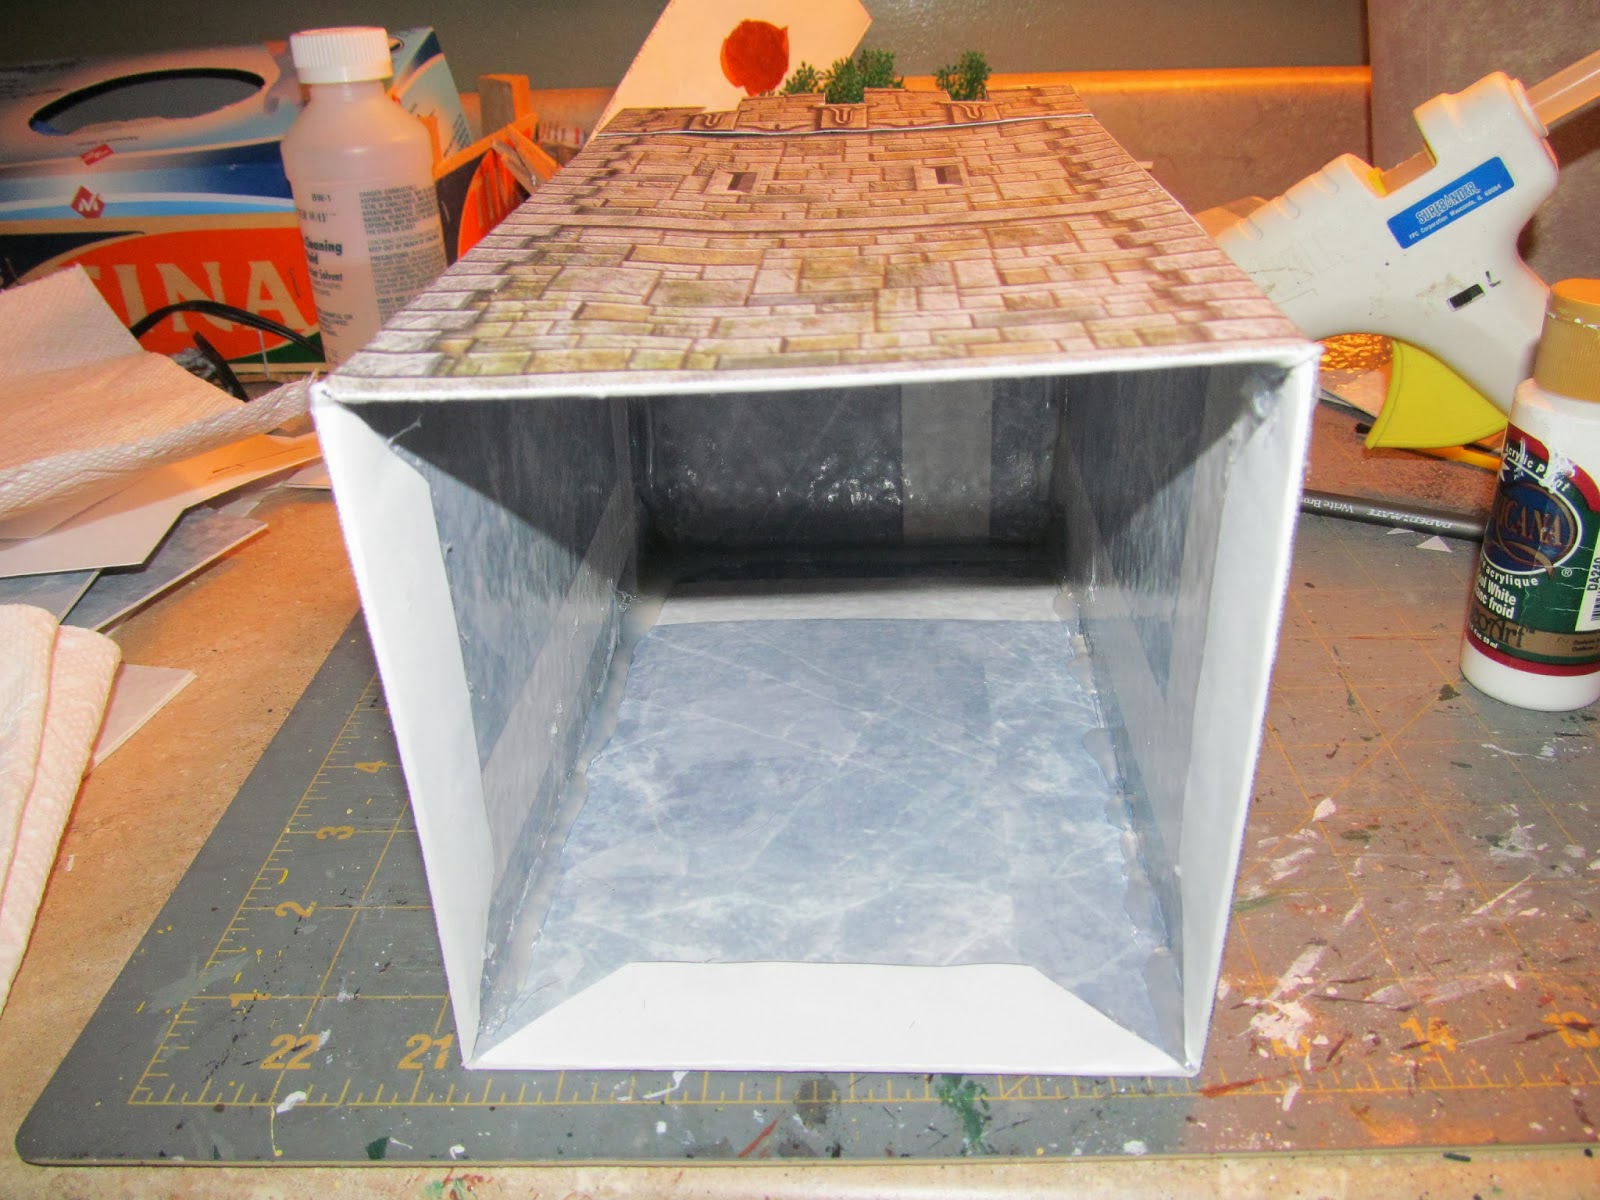
Here are some photo's of two completed structures, a tower, and a wall section. These models are from the Fat Dragon Borderland Keep set.
#4 - Strengthening Card Stock Buildings:
I love card stock buildings, for my fantasy miniature games! Problem I have had, though, is that they get trashed during the game, and afterwards, when I store them -- mine tend to be far too delicate, and any mishandling seems to damage them very quickly.
Granted, they are only made of paper, but the ink is not cheap! I also put a lot of hours into assembling them, perhaps even basing them. All of that hard work goes into the trash after a building gets crumpled, smashed, or bent, when being handled... Arrrgh!
To preserve my works (time, effort, money), I decided to experiment with using vinyl, peel-and-stick, floor tiles. I had already used them to back card stock floor tiles, for my dungeons, so it was not much of a stretch to apply the same concept to 3-D buildings.
While there is no cosmetic difference produced by this method, it does dramatically strengthen the buildings, as well as giving them considerable "heft" -- they won't blow over with a slight wind after being reinforced with vinyl tiles! Here is the procedural process, step, by step... Cheers!
====================================================================
Step 1: Measure the inside dimensions of the walls, floors, ceilings, etc., of the structure, and then subtract 1-2 mm. Cut your vinyl floor tile pieces to match the measured sizes, then lay them over their positions, on the card stock, to verify they are the correct size. A millimeter, or two, of free space, on three sides, is acceptable; make sure you position the vinyl piece against the supporting edge (floor), when you check that it is cut to the correct size.
Step 2: Dry fit your card stock model together, and decide which glue tabs you will keep, and which you will need to cut off, to allow access with your Hot Glue Gun (used to adhere corners of the vinyl floor tiles, within the structures -- this is what creates the strength, holding the floor tile 'skeleton' structure together).
Step 3: Assemble your building, as you normally would, with PVA Glue, or whatever glue you prefer. Let the assembled building dry for as long as necessary, before moving on to the vinyl floor tile installation, in the next step.
Step 4: Do a dry fit, with the vinyl floor tile pieces, for each wall, floor, etc. Then peel off the wax paper from the glue side of the tile pieces, and install them, one by one, pressing them into place, attaching them to the inside of the paper walls, ceilings, etc. Be sure to position the vinyl tile pieces at the supporting edges (bottoms, usually) of the structures, realizing that the Hot Glue applied in the next step, will shore up gaps between the tile pieces, eliminating flexure.
Step 5: Now, having made sure the vinyl tile pieces are fully attached to the card stock sections, use your Hot Glue Gun to inject molten plastic Glue into each join: floors, walls, ceilings, etc. Let it cool, and set up, fully. Trim any excess Hot Glue, as necessary. Then set your finished model upright, and check your work.
Step 6: Move on to your next building, or project...
=====================================================================
Here are some photo's of two completed structures, a tower, and a wall section. These models are from the Fat Dragon Borderland Keep set.
 |
| Inside view of the finished tower. Note the Hot Glue along the seams of the vinyl floor tile skeleton structure. |
 |
| Here
you can see the floor tabs have been folded over the attached floor tiles, giving a nice, finished edge to the base of the tower. |
 |
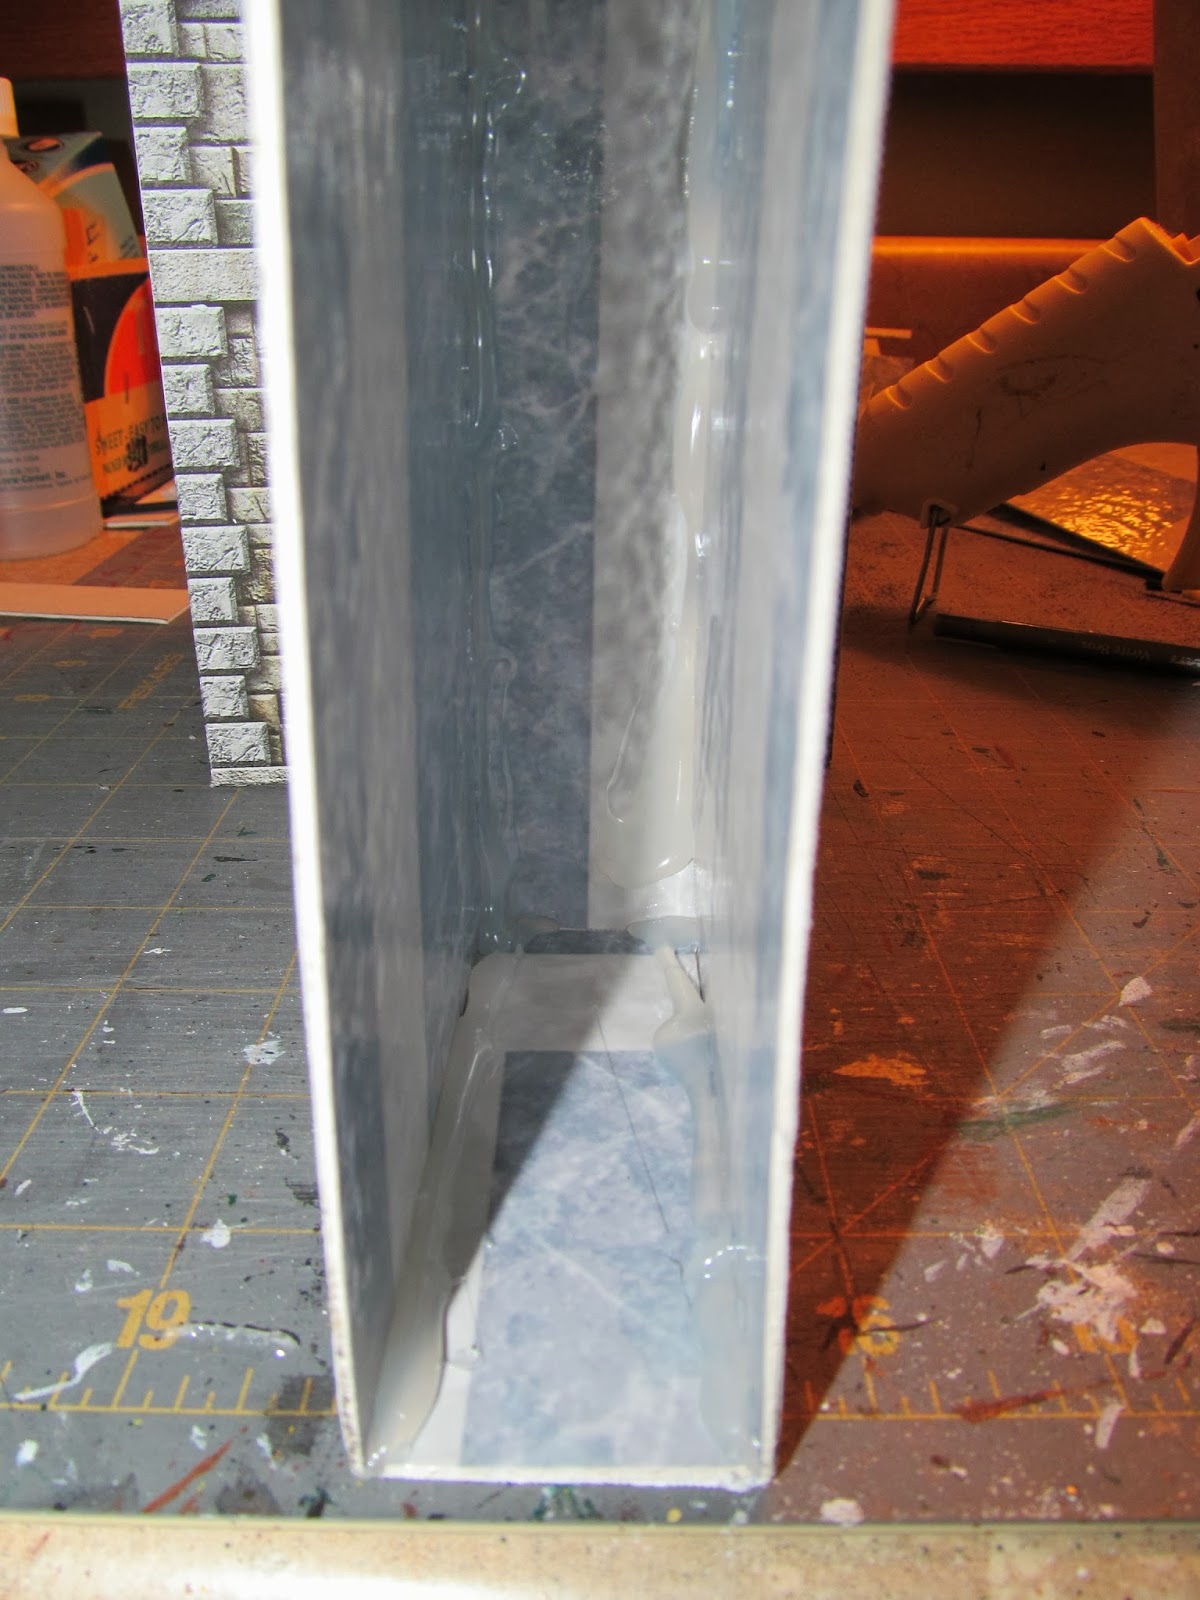
| This
photo shows a closer view of the hardened, Hot Glue seams, which hold the floor tiles in place, giving the model superb strength, and much needed weight, or heft. Note: neatness does not count! Getting a bead of molten Glue along the seams, does! |
 |
| Here is an inside view of a wall section, with vinyl tile reinforcement in place. |
 |
| A
close up view of the inside of the wall structure, clearly showing how the tile pieces were placed, and strengthened, with Hot Glue applied along the joins. |
 |
| Another view of the wall section, showing that even the upper floor of the wall has been successfully strengthened with vinyl floor tile. Getting the Hot Glue Gun into this space required a bit of pushing out on the sides, but everything went back into place, perfectly. Once the Glue hardened, the wall section was ready for gaming. |
 |
| Here is the wall section, and the tower, positioned as they would be for a game. While the Hot Glue, and vinyl floor tile have not altered their appearance, they certainly have added structural strength, as well as lengthening their life in my gaming supplies, by preventing handling/storage damage, or at least minimizing it! It's extra work, but I believe it is worth the time, effort, and supplies needed. YMMV, of course... |
NOTE: MDF or Vinyl Floor tiles will work for the river sections shown below.
#5 - Basing Fat Dragon
Game's Rivers & Streams Set:
Rivers and streams have always been a challenge for the tabletop. Some of the techniques I've used in the past consisted of: blue felt strips; lines drawn on a battlemat, with wet-erase markers; and even bits of blue construction paper. None of them have been very good looking, but all were serviceable.
There are commercially produced rivers, and streams, made of various materials; there are 'how-to' articles on the Internet explaining how to make them out of various materials, including RTV Silicone, and latex caulking used for sealing windows and doors. There are a great many methods to create rivers and streams, with varying levels of realism. I wanted something that was incredibly simple, looked good, and was easy to use, and easy to store, but I wanted something that would be durable, and last me for many years of mini's gaming. Enter Fat Dragon Games, and their wonderful PDF of Rivers & Streams.
To make them both durable, easy to store, and easy to
use, I decided to mount them to vinyl floor tiles (I still have a number of these in my crafting room, left over
from other projects, some which are yet to be finished...).
My technique is similar to what I did for the Copper Dragon Dungeon Floor Tiles: glue the cut-out river sections to the glue-side of the vinyl floor tiles (4 sections per 12"-square tile), then cover the whole tile with clear Contact Paper, to seal, and protect the printed side of the card stock; after that, I simply cut them out, making sure the water edges were as cleanly cut, as possible (I used my heavy duty kitchen shears, because using a razor blade, and a steel ruler, would take too long, and require too much effort -- I cut up six tiles, into 24 river/stream sections!).
Rivers and streams have always been a challenge for the tabletop. Some of the techniques I've used in the past consisted of: blue felt strips; lines drawn on a battlemat, with wet-erase markers; and even bits of blue construction paper. None of them have been very good looking, but all were serviceable.
There are commercially produced rivers, and streams, made of various materials; there are 'how-to' articles on the Internet explaining how to make them out of various materials, including RTV Silicone, and latex caulking used for sealing windows and doors. There are a great many methods to create rivers and streams, with varying levels of realism. I wanted something that was incredibly simple, looked good, and was easy to use, and easy to store, but I wanted something that would be durable, and last me for many years of mini's gaming. Enter Fat Dragon Games, and their wonderful PDF of Rivers & Streams.
 |
| Here is a close-up of some of the pieces from this set, to give an idea of what it looks like. |
 |
| Four stream sections fit onto each 12"-square floor tile, which makes for very good economy of use! After applying the stream sections to the tile, carefully aligning them to fit to the edges of the tile, I applied a cut-to-size piece of Clear Contact Paper, smoothing it out carefully, to avoid air bubbles and wrinkles. Note that the Contact Paper extends beyond the edge of the tile, on each side! This allows it to be cut to size, matching the edge of the vinyl tile. |
 |
| A few of the tiles showing a close-up of their designs. Some appear to represent portage points where rocks can be seen just below the water. There are also many fish seen on these tiles, swimming in the water -- shucks, I forgot my rod and tackle at home... |
My technique is similar to what I did for the Copper Dragon Dungeon Floor Tiles: glue the cut-out river sections to the glue-side of the vinyl floor tiles (4 sections per 12"-square tile), then cover the whole tile with clear Contact Paper, to seal, and protect the printed side of the card stock; after that, I simply cut them out, making sure the water edges were as cleanly cut, as possible (I used my heavy duty kitchen shears, because using a razor blade, and a steel ruler, would take too long, and require too much effort -- I cut up six tiles, into 24 river/stream sections!).
 |
| To trim the Contact Paper, I used a razor knife, and a metal ruler, aligned to the edge of the vinyl tile. This allowed me to trim the Contact Paper to the very edge of the vinyl tile, making a perfect match, with nothing hanging over to catch. |
I used six vinyl floor tiles, which yielded a total of 24
stream sections. Below, you can see them stacked neatly, for storage, as well as all 24 tiles laid out on the
floor, to demonstrate how they can be configured. The total length for those 24 tiles, with multiple 90-
degree bends, was 9 feet 7 inches! The total time invested in this project, was one afternoon of printing,
mounting, covering, cutting, trimming, and playing to verify they worked properly...
 |
| This is 24 stream tiles, stacked, ready for storage. |
 |
| All 24 tiles, arranged in a demonstration of just how long a stream they can make. |
 |
It may be hard to see, but the last stream tile is at
about 115 inches, or 9 feet 7 inches!
|
7-12-2023
NOTE: the vinyl floor tile material warped making the scale no longer usable. I recommend MDF in its place.
#6 - Making a Height Scale Gauge for Miniatures of all Shapes and Sizes:
I've seen several people using scales, with horizontal lines, marking heights in millimeters, on various web sites. I really like them, and I find them quite useful -- I have been wanting to have one for myself, so I set about making one. Here is how I did it, and you can make one for yourself, too...
I had these materials at hand, already paid for: vinyl peel-n-stick floor tiles; cardstock, and my trusty Hot Glue Gun. This is not the only way to make one, it is just how I built mine. Feel free to adapt this outline to your needs, and the materials you already have at hand.
Step 1:
Create the scale on your computer, using your favorite word processor, or, better yet, a desktop
publishing program, such as Microsoft Publisher (my personal favorite, go-to for all things printed). Print this out on white card stock, at high print quality, as you will need to use a fairly small print font, say around 6 point size. I made my scale quite large, up to a height of 80mm tall, with horizontal lines ever 5mm, to accommodate nearly any gaming figure, including vehicles for larger scale games, using 54mm Army Men figures, and their vehicles.
Step 2:
Cut a 12"-square, vinyl peel-n-stick tile to the proper size for the Scale. Note that I printed my Scale up, from the bottom edge of the page, to allow me to fold it forward (score the base tab, appropriately for folding), to create a base for the mini's to sit on top of; this also allowed me to create a T- shaped base for the scale, to allow it to stand freely, without support, on my tabletop, for photography.
Step 3:
Cut the tile left-over pieces for both the front, and the back, of the T-base portions: there will be two smaller pieces, for the front, and the back, as well as a larger, third piece, which will attach to the smaller two pieces, forming the T-base.
Step 4:
Dry fit the tile pieces to the card stock piece (creased base, folded forward, in front of the Scale), then peel the adhesive protectant paper, and stick the tiles to the card stock piece. Note that the first two pieces of cut tile are not attached to each other; the card stock forms a hinge between the two vinyl pieces. Now fold the Scale's base forward, and attach it to the base tile piece, properly aligning them, leading edge to leading edge -- the Scale will be hanging by the card stock hinge, so lay it face down on your work table; then attach a cut-to-fit vinyl piece, tape side to tape side, to cover the back of the base, butting against the vertical Scale. This will form a T-shaped piece, which will not stand vertical, yet...
Step 5:
Use a box of some sort, to hold the Scale vertical, and attach it to the box with some type of clip, to hold it in place. On the back, tile side of the Scale, begin applying Low Temperature Hot Glue (High Temperautre Hot Glue remains molten too long for this join, except for the final application before applying the vinyl piece at the 45-degree angle, which I wanted more work time, to press it into position), to the seam, to begin to reinforce it, to hold the Scale vertical, on its own. It will take several layers, to make it solid, and non -flexible.
To greatly strengthen mine, I layered up Hot Glue, to form a fillet, much like a welder would form a join in the seam; then I applied a cut-to-fit strip of vinyl floor tile over the Hot Glue fillet, while it was still soft, at a 45-degree angle. On both seams of this vinyl strip, I added another fillet of Hot Glue, to form a very strong support, which should withstand moderately rough handling.
This is certainly not the only way to build a Scale, but it is one way which is easy, inexpensive, and functional. The total construction time took less than two hours, and it took me that long because I was figuring it out as I went! I hope you find it useful for your gaming needs. Cheers!
#6 - Making a Height Scale Gauge for Miniatures of all Shapes and Sizes:
I've seen several people using scales, with horizontal lines, marking heights in millimeters, on various web sites. I really like them, and I find them quite useful -- I have been wanting to have one for myself, so I set about making one. Here is how I did it, and you can make one for yourself, too...
I had these materials at hand, already paid for: vinyl peel-n-stick floor tiles; cardstock, and my trusty Hot Glue Gun. This is not the only way to make one, it is just how I built mine. Feel free to adapt this outline to your needs, and the materials you already have at hand.
Step 1:
Create the scale on your computer, using your favorite word processor, or, better yet, a desktop
publishing program, such as Microsoft Publisher (my personal favorite, go-to for all things printed). Print this out on white card stock, at high print quality, as you will need to use a fairly small print font, say around 6 point size. I made my scale quite large, up to a height of 80mm tall, with horizontal lines ever 5mm, to accommodate nearly any gaming figure, including vehicles for larger scale games, using 54mm Army Men figures, and their vehicles.
 |
| Two
Human miniatures demonstrating the Scale in use. Note that the figure on the left, is a standard 25mm scale figure; while the figure on the right, is a D&D pre-paint, at 30mm scale. Also of note: the bases must be manually, mentally subtracted from the height of the figure, or its eye height, to get an accurate height. |
Step 2:
Cut a 12"-square, vinyl peel-n-stick tile to the proper size for the Scale. Note that I printed my Scale up, from the bottom edge of the page, to allow me to fold it forward (score the base tab, appropriately for folding), to create a base for the mini's to sit on top of; this also allowed me to create a T- shaped base for the scale, to allow it to stand freely, without support, on my tabletop, for photography.
|
| Inexpensive, vinyl peel-n-stick floor tile, usually around $0.60 per 12"-square. Many uses, besides covering your floors! |
Step 3:
Cut the tile left-over pieces for both the front, and the back, of the T-base portions: there will be two smaller pieces, for the front, and the back, as well as a larger, third piece, which will attach to the smaller two pieces, forming the T-base.
 |
| Close-up view of the base construction. The base is actually three separate pieces of vinyl floor tile: one larger piece, underneath, which has the top, two cut pieces glued to it, using the tiles' own glue, glue-side to glue-side, for a very strong bond. The vertical, scale portion, is printed card stock, attached to a cut-to-size, piece of floor tile -- just peel the backing off, align, and press into place using the tile's glue, to form a permanent bond. This photo also shows how the vertical Scale portion was secured in place, to stand on its own, with a fillet of Hot Glue, and a cut-piece of floor tile, at a 45-degree angle, to reinforce the whole joint. |
Step 4:
Dry fit the tile pieces to the card stock piece (creased base, folded forward, in front of the Scale), then peel the adhesive protectant paper, and stick the tiles to the card stock piece. Note that the first two pieces of cut tile are not attached to each other; the card stock forms a hinge between the two vinyl pieces. Now fold the Scale's base forward, and attach it to the base tile piece, properly aligning them, leading edge to leading edge -- the Scale will be hanging by the card stock hinge, so lay it face down on your work table; then attach a cut-to-fit vinyl piece, tape side to tape side, to cover the back of the base, butting against the vertical Scale. This will form a T-shaped piece, which will not stand vertical, yet...
Step 5:
Use a box of some sort, to hold the Scale vertical, and attach it to the box with some type of clip, to hold it in place. On the back, tile side of the Scale, begin applying Low Temperature Hot Glue (High Temperautre Hot Glue remains molten too long for this join, except for the final application before applying the vinyl piece at the 45-degree angle, which I wanted more work time, to press it into position), to the seam, to begin to reinforce it, to hold the Scale vertical, on its own. It will take several layers, to make it solid, and non -flexible.
To greatly strengthen mine, I layered up Hot Glue, to form a fillet, much like a welder would form a join in the seam; then I applied a cut-to-fit strip of vinyl floor tile over the Hot Glue fillet, while it was still soft, at a 45-degree angle. On both seams of this vinyl strip, I added another fillet of Hot Glue, to form a very strong support, which should withstand moderately rough handling.
 |
| The finished Scale, free-standing, ready to use! The top numbered line, reads 80mm, with another line above it, to mark the maximum height of 85mm. |
 |
| Rear view of the finished Scale, showing the join, and the floor tile pieces. |
 |
| Another view of the join, and the sandwiched base pieces. |
 |
| A close-up view of the join. Here you can see the Hot Glue fillet, beneath the angled tile piece, as well as the Hot Glue fillets along each seam. This join is not the only method which will work: small, angle iron pieces could easily be Hot Glued into position to accomplish the same thing, but I did not have any on hand, so I went with a large amount of Hot Glue, which I did have plenty of at the time of construction. Use what you have, or are willing to go and get... |
This is certainly not the only way to build a Scale, but it is one way which is easy, inexpensive, and functional. The total construction time took less than two hours, and it took me that long because I was figuring it out as I went! I hope you find it useful for your gaming needs. Cheers!
That is a really awesome set of ideas!
ReplyDeleteThanks for making me buy yet more inexplicable things (to my wife's way of seeing it, anyway.)
Very Good! My name is Ralph Wagner of the Kent and Kenmore Gammers in Akron Ohio We had two fellows who started the club Tom Moldvay, and Lawrence Schick both worked for TSR. They did things on the cheap all the time. Lawrence used a lot of rubber bugs for monsters that came out of a quarter turn crank machine. and Tom once used a cave man in a wagon that threw rocks. We used Arifix oo figures for Characters. I have a huge fantasy army in plastic 54mm and 1/72. I have been collecting for 60 years. There is a Russian company Tehnolog that makes great 54mm fantasy figures. They are a gift from the gods. You can only get them on Ebay. Our web sight can fill you in on how to buy. I hope this helps you . Keep experimenting failure is part of success. Ralph Wagner
ReplyDelete